Monday, June 30, 2014

Rainbow Smoothies for Summer

I love fruit- it's probably my favorite food group. And one of the reasons I like summer is because so many different fruits are in season. I've recently started making 'smoothie packs' in order to try to hold onto these delish summer flavors a little longer. I have to admit that all of the smoothie packs I've made so far have been blended into a tasty pulp already- but my plan is to make some and then save them so I can enjoy my favorite seasonal fruits well into their off season :) 


I prep all my smooth ingredients first. So for this particular batch of smoothies I used:
Cherries (cut in half and pitted)
Sweet potato (cubed and boiled until they are soft)
Mango (cubed)
Spinach 
Avocado (cubed)
Blueberry yogurt (thats the only flavor I had)
Banana (sliced)


I put some of each of the ingredients into sandwich bags. This time, I cut up enough stuff to fill three bags about 3/4 of the way full. After everything is in a bag, I put them in the freezer until just before I want to make a smoothie.


When I'm in the mood for a smoothie, I take a bag out of the freezer and let it thaw out just enough so I can break the ingredients apart from each other into big chunks. I put them in the food processor and let it do its thing. 


The smoothies are cold, delicious, and taste like summer :) 


Weekend Goodness

Maggie goes where I go. 
The dog park is FULL of clovers. They smell so good- I love it. 


Since I've been on summer break, I've had more time to do things- like longer play time at the dog park.
Nella actually has gotten tired a couple times (weird, I know)! 

Look at the sleepy puppy after a long dog park session! I need to do this more often ;) 
I went over to my friend Krystal's house and got to hang out with her kid, her sister's kids, and some extra kids who were there for the day :) We went to the park. 

Look at those rolls! 


I had friends over for brunch on Sunday.
I love brunch.
(And I love my friends)

My newly refinished drink cart being used (by more than me) for the first time!

Not the best pic, but it was the only one where she didn't look like a blurry fuzzball! The kittens are getting so playful. I wish I could set up a kitten-cam and watch them play through out the day- they are so adorable! 


My sister, Rosie, gave me a henna tattoo.
She is awesome at it- she can henna pretty much any design and it looks amazing. 


I brought  Maggie and Nella to my parents' house on Sunday so that my dogs could play with their dogs. I was only going to stay for a little while but then I decided to play with the kittens while the dogs played with each other. Then Rosie gave me a henna tattoo. A neighbor/friend came over and Rosie gave her a henna tattoo too. Then we (my parents, Rosie, and Sean-my brother-and I) went over to the neighbor/friend's house and hung out way later than I anticipated. It was a fun night :) 


Thursday, June 26, 2014

How To Make a Brooch Bouquet

I love how weddings can be so different but equally as full of love and as fun as each other. I'm going to a friend's wedding shower this weekend and her excitement about her upcoming wedding reminded me of one of my favorite things from my own:
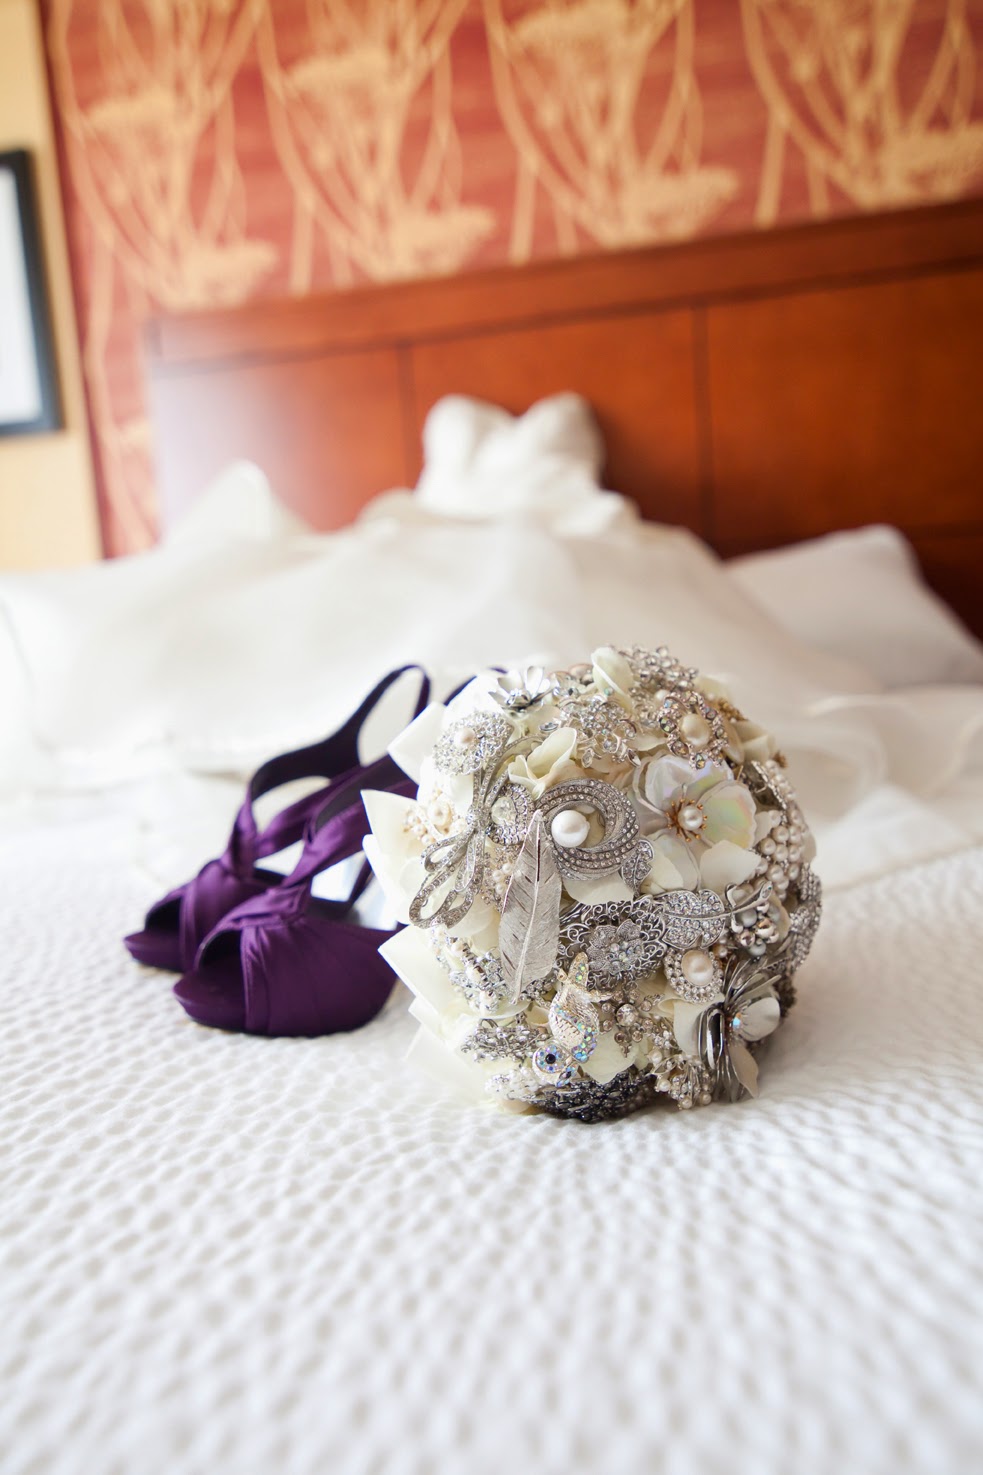
Photo: ©byMcKee 2011
My Bouquet! 


I made my bouquet (and my bridesmaids') with a little help from my mom, friends, and Dan. The process was fairly time consuming and could be expensive (depending on the direction you decide to take), but was totally worth it for me.


Photo: ©byMcKee 2011

I had been dabbling in wedding things via Pinterest and Etsy for a little while before Dan and I were engaged. (We had been dating for about nine years, so I had a pretty good idea that an engagement/wedding was coming). Somehow, I came across brooch bouquets and thought they were awesome. I tried explaining the idea to my mom and friends, and I could tell that they thought it could be a cool idea, but couldn't really picture it in real life. Being the wonderful people they are, they started collecting brooches for me anyway. 


Between August 2012 and September 2013, we collected about 120 brooches (and some earrings and some buttons). They came from thrift shops, antique shops, ebay, and people's own stashes :) My personal rule was that I wouldn't spend more than $3.00 on a brooch unless is was really cool or really big. If I would have bought all of the brooches myself and stuck to the $3.00 a brooch rule, I would have spent $360.00 on brooches alone. In reality, I ended up spending about $100.00 on brooches over the course of a year. Not too bad. 
Once (almost) all of the brooches were collected, I started assembling the brooch "flowers". This is the time consuming part. I really have no idea how long this part took- I had help from my mom and sisters, help from Dan, and help from friends. I worked on a little bit at a time. I started making the "flowers" on the 2nd of July and finished the final bouquets mid-October. This might seem like I stretched out the process over a long time (and I did) but it made the process way less stressful than it would have been had I tried doing it all at once. 


To make the brooch flowers you need:

- wire (you can get it in pretty much any color and gauge-I used silver because it blends with the brooches better and I can't remember what gauge I used but I feel like maybe it was 20)
- needle nose pliers (to save your fingers from pain and agony)
- brooches (I used about 60 for my bouquet and about 10 in each of the bridesmaids')
-florist tape (green or white- I used white because I knew I was going to wrap the "stems" in cream colored ribbon, but green could blend into flower stems better)


How to Make the Brooch Flowers:

1. Choose a brooch. Start with on that has lots of "holes" in the top- it makes figuring out this process easier.
2. Cut a piece of wire that is about 20-24 inches long. String the wire through one of the "holes" in the brooch so that you can create a "stem". If you are holding the "flower" by the bottom of the "stem" it should look like you are holding two wires- one wire the goes up, then the wire curves through the brooch, and then it curves back down through the brooch and into your hand. 
3. Twist the two parts of the wire together- here is where the needle nose pliers come in. Use them to get a good twist. If you don't, you will regret it :)
4. Depending on how heavy the brooch is, you might need to repeat the wire part. If you can hold the "flower" by the "stem" and it doesn't look like it's wilting, you're good! If it starts to wilt, add more wire. 
5. Wrap the "stem" in floral tape. It will make your fingers sticky. 
6. Admire your work. 
7. Repeat all steps until you don't think you can repeat anymore. 

The blisters were worth it, right Sarah?
Seriously- Thanks for helping me! 


I know the picture isn't the greatest, but it shows some of the finished brooch "flowers"


To make this bouquet work, it needed a base. I used some nice fake flowers as my base. You could definitely use real flowers, but with all of the positioning and repositioning of the brooch flowers, the real ones would look pretty sad by the time you were done with them. Plus, you couldn't make a bouquet very far in advance.

My mom and I found some nice looking fake hydrangeas at Hobby Lobby. Remember you are going to cover the flowers in brooches, so you will only see little sneak peaks of them.  I used three in my bouquet and two in the bridesmaids.


How to Assemble the Bouquet:
1. Decide how big you want your bouquet, buy flowers accordingly. 
2. Start by adding one or two or three brooch flowers to your base flower and use florist tape to secure the stems together. Don't push your brooch flowers too deep into the base flower or you won't see the brooches. (I found it easier to start with one stem at a time and add brooch flowers to it, then put three mini bouquets together- do what works best for you.)
3. Keep adding and taping brooch flowers until your base flowers are covered nicely. You might add something and decide you want it somewhere else- that's okay as long as you realize this before it's taped too deeply in the mix. 
4. The bouquet is going to get heavy from all of the brooches- decide if you want to carry a huge weight around for your whole wedding. 
5. Realize that it's going to look awesome and you will continue toning your arms even during the ceremony. 
6. Once all of the brooch flowers are added to the base flowers, give the stems a good wrapping in tape. 


Bridesmaids' bouquets- brooches added (I only had brooches go down the middle of theirs), stems wrapped
7. Cut off the excess wire and stems. Decide how long you want your stems to be and cut everything off at the point. I couldn't find an easy way to do this. I used wire cutters and snipped a little off at a time.
8. Decorate the stem area. I didn't want any wire showing, so I made little ribbon loops that kind of peeked out from under the bouquet (see the photo below). To make these, cut strips of ribbon, fold them in half, and tape around the base of the bouquet. This was my least favorite part- probably because I did it at night when I was tired, stressed, and hungry- not a good combination!
9. Wrap the stem. I took a strip and covered the bottom. Then a cut another strip and covered the bottom in the opposite way (so there was an 'X' of ribbon at the bottom of the bouquet.) Tape around this 'X'.
10. Then, keeping the ribbon connected to the spool, I covered the bottom one more time. Instead of cutting anything, I took the rest of the ribbon and wrapped it around the stems. I started close to the top and worked my way towards the bottom. The ribbon overlapped itself as a I wrapped it tightly around the stem.
11. At the bottom, cut the ribbon, fold the end under itself, and use pins to secure the ribbon.
12. Check out all your hard work!


Photo: ©byMcKee 2011


Photo: ©byMcKee 2011


Incase you need a breakdown on cost, here it is (I got my supplies at Hobby Lobby and Joann Fabrics): 


What this could have cost to make One Bride's bouquet and Six Bridesmaids' bouquets had I not looked for sales and deals and such: 

Brooches: $360.00 plus
Wire: 4 packs- not sure how many yards- at $2.00 each= $8.00 total
Tape: a pack of 3 rolls for $3.00- 2 packs = $6.00
Flowers: $8.99 a stem for 15 stems = 134.85
Ribbon: $2.99 for 10 yards of 1 1/2 inch thick satin cream ribbon- three rolls- 8.97
Pins: box of 144  for $4.99 
Total: 522.81


What making 7 bouquets Actually Cost Me: 

Brooches:   $100.00        
Wire: 4 packs- not sure how many yards- at $2.00 each= $8.00 total
Tape: a pack of 3 rolls for $3.00- 2 packs = $6.00
Flowers:  $4.49 a stem for 15 stems= 67.35
Ribbon: $2.99 for 10 yards of 1 1/2 inch thick satin cream ribbon- three rolls- 8.97
Pins: $3.99 for a box of 144
Total: 194.31


To make Just my Bouquet, it would have Cost:
Brooches: 100.00
Wire: 2.00
Tape: 3.00
Flowers: 13.47
Ribbon: 2.99
Pins: 3.00
Total: 124.46


Even though they turned out to be a lot of work, I would definitely do this again. I can keep it forever and/or let friends and siblings use it if they want because it can never die :) My bouquet turned out to be beautiful.


Tuesday, June 24, 2014

Mini Makeover (Number Two)


Dan and I were driving home from his mom's house a while ago and I spotted this gem by someone's garbage. We pulled over, checked it out, and saw that it was in pretty rough shape (obviously- someone was throwing it away). But, the metal part was not in rough shape and the main wooden part seemed sturdy. So, we (and my we, I mean Dan) put the very heavy sewing machine table into the back of my car. We got it home and it sat awkwardly in our kitchen for a little too long until we had time to do something with it. 


Dan took the sewing machine out- it is SO heavy! And took off the hinge-y top layer. That's the technical term - haha :)  With Nella's guidance, he added some wood to the top so that there wouldn't be a huge hole in the middle. After he sanded it and rounded the edges, we painted it. 


After we painted it, I realized I wanted it to have new knobs. So I twisted/pulled the old ones off, and drilled some holes where they used to be. 


I gave the whole thing a second coat of paint and added new knobs. 

I love the way it turned out. 
It's the perfect edition to our entry way. 


Monday, June 23, 2014

Mini Makeover (Number One)


Our supplies for mini makeover one and mini makeover two. 
Why I love estate sales:
       1. You get to walk through people's houses. It's cool and kind of creepy at the same time. Learning about other people's lives only by looking at their stuff is fun- I get to play anthropologist. 
       2. The people holding the sales are trying to get rid of lots of stuff fast, that (usually) means really good prices! 
       3. Sometimes I find thing(s) I want. Like this:


I had to sign a waiver pretty much saying I wouldn't sue if I got hurt (seriously). I climbed into/through a rickety old barn full of everything from cars, boats, and furniture to cookbooks, clothing, and tools. I got to walk through someone's house and I tried to enter a room that said "do not enter". Sitting on the driveway in an easily accessible spot was this cart. I grabbed it and asked the seller what he wanted for it. I wasn't going to pay more than $10.00. I got it for $3.00. Perfect. 


I spent more time than I anticipated sanding away rust and paint and then I spray painted the entire cart light blue. It looked so much nicer already! 


It's perfect as a drink cart.

Or breakfast/brunch drink cart- because those are my favorite meals of the day  :)


Sunday, June 22, 2014

Weekend Goodness

Look at this cute baby! More on her in a little bit. . . 

Rosie's graduation party was this weekend. We partied with aunts, uncles, cousins, second cousins, grandpa, and Rosie's friends. Rosie gave a few henna tattoo :)
Afterward, Dan and I met up with his sister and her husband for a birthday drink! 

Look at these cute babies!! Rosie's friend found them on the side of the road and called my mom (who is pretty much an animal whisperer) to come help them out. My mom collected the kittens and brought them home. She thinks they are about a month old and is going to take care of them until they are old enough to live on their own (at someone else's house, of course). 

Hopefully this little one can come live with me and Dan. 

Her name is Chrysanthemum. 


Dan and I wanted to go to the air show on Saturday, but it was super foggy downtown. 

So we listened to This American Life and got ribs from a food truck instead. It was perfect. 

We started two mini makeovers- I'll do a post on that when they are finished :)

Friday, June 20, 2014

My Last Day of School (for 3 weeks)

My goal (for the next three weeks, before summer school starts) is to relax.  As I was leaving school today, I had a mental list of things I wanted to do when I got home and in the next few days. Then I sat down. I'm on the go all the time- I like to be- but sometimes I need to make my self slow down. 

I left school today with mixed emotions. It's a really bittersweet thing, to end a school year. 


I had a quick meeting (my classroom is moving. . . not sure how I feel about it yet. . .  I'm being moved to the upstairs, back corner of the school- that's a minus. Special Ed. is getting moved back there with me- that's a plus!) cleaned my room, got brunch with some teachers, and left. At 11:15. 


And now I'm home and I feel like I'm forgetting something. 


I don't have to plan lessons, I don't have to pack my lunch, I don't have to pick out my outfit for tomorrow, I don't need to worry if we have enough snack for everyone, I don't have to get prizes for the prize box, I don't have to get any materials together. . . it's weird. 


I know everyone says this, but I can't believe how fast this year went! At the beginning of they year, I thought it was going to take forever. The start of the year was hard. Multiple people told me they have never seen a group of kids that acted the way my morning class did- and that was not a compliment to them. The kids were all over the place. Their behavior was terrible. Every day on my way to school, I would call Dan and talk about how I hoped the morning would just be okay. Not even good- just okay. Compared to how things usually went, okay was good.  After my morning class was over, I could breath a little because my afternoon class was much better. On one of the really hard days, a teacher who helped out in my room sometimes said, "We're going to think about today at the end of the school year and laugh about this." I hoped to god she was right. 


It took a couple sets of conferences, a bunch of phone calls home, a suspension or two, daily conversations with parents, and a lot of patience before the morning class finally got into the rhythm of the day (right after winter break- in January). I don't know exactly when, but I switched from hoping for an okay day to planning for a good day. 

We were getting things accomplished! Instead of focusing on social skills and barely being able to read a story as a class, they were saying "read it again!".  One day last week, we ready five books in a row. They kept asking to read another one, so we did. The same teacher who said we would laugh about the beginning of the year saw me waiting with one of my kids to get picked up. She mentioned how he was doing a great job waiting. This kid quietly walked around with me and chatted while we waited for his grandma to pick him up. At the beginning of the year, he would have yelled and ran around until I grabbed him. And then I would have had to hold his hand so he couldn't get away or because no distraction would have been good enough to keep him busy until he got picked up. 


After such a stressful start to the beginning of the year, I'm a little nervous to start next year. We got to such a good place at the end of the year, but I guess that's part of my job. These kids come to me with no school experience, and in many of their lives they have absolutely no structure. Learning structure can be hard. 

And now. . . my little 4Kers are ready ready for kindergarten. 


Wednesday, June 18, 2014

Things Kids Said on a Wednesday


Ice cream cone cupcakes. The kids were delighted and confused.


Guys, this is the last "Things Kids Said on a Wednesday" of the school year! Today was the AM class's last day and tomorrow the PM finishes up. It's bitter sweet for me.

I got a lot of "You're the best teacher ever", "You'll be my teacher in Kindergarten, right?", "I'll miss you!", "You're my favorite teacher ever".  (I'm also the only teacher they've had so far, but I'll take it! Haha).


I made a book for each of my kids. They wrote the ABC's, drew a picture of themselves, told me their favorite things, talked about what they learned this year, and I included photos of different activities we did through out the year. 


My sister, Rosie, came to school with me and one of the girls asked if Rosie had a boy friend. Once they found out she did (and they found out his name), the girl sang, "Rosie and Tom, sitting in a tree- K-I-S-S-L-M-N-O-P"


A girl was trying to ask me to staple something and said, "Can you snap this? Snap it up please? Just snap it right here."


"When I grow up, I'm gonna have wings and be a flying girl!"


Congratulations is a long word.


"MissElwee. . . I'm moving to Texas. And you're coming with me. Maybe we can go to Six Flags." Ok, but I'll have to let Mr. McElwee know. He might want to come too.


"You are my most favoritist teacher ever- until I go to Kindergarten"


"We'll all be in the same class next year, right Ms. McElwee? And you'll be our teacher next year, right Ms. McElwee?"


"Where is Carlos?" Carlos hasn't been in our class since before Christmas- he moved.


They each decorated a 'graduation' necklace to wear. We didn't have an actual graduation, but we did have a party! 


A girl got up in the middle of attendance and asked, "Is this a dream?" I said yes, you're dreaming. And she said, "Did you hear that everyone? We're all in a dreeaamm!!"


One of my kids got me a typograph thing that says 'Smile, the best is yet to come'. He was really excited to give it to me. When I opened it, his happy expression fell off his face and he said, "What is that?" with a disgusted tone. I read it to him and all he said was, "oh". As I was putting it back in the bag, I found a card and opened it up. The kid's face lit up! This  was the best part! I was a robot card! And he wrote his name on it for me! The kid acted like a robot for about 10 minutes after I opened the card. It was awesome.